Convert json array to html table
1. Suppose you have a json array, or data in a List Map which is displayed in a ListView.
e.g. fruits.json file in assets folder
To read it and set the json array to a string variable:
a) Add a method to read assets file:
public String _readJsonFromAsset(final String _filename) {

		String json = null;

		try {

			InputStream is = this.getAssets().open(_filename);

			int size = is.available();

			byte[] buffer = new byte[size];

			is.read(buffer);

			is.close();

			json = new String(buffer, StandardCharsets.UTF_8);

		} catch (IOException ex) {

			ex.printStackTrace();

			return null;

		}

		return json;


	}
For above method, in Sketchware, you can create a more block readJsonFromAsset of type String and with a String variable filename. Then put codes below.
    String json = null;
    try {
        InputStream is = this.getAssets().open(_filename);
        int size = is.available();
        byte[] buffer = new byte[size];
        is.read(buffer);
        is.close();
        json = new String(buffer, StandardCharsets.UTF_8);
    } catch (IOException ex) {
        ex.printStackTrace();
        return null;
    }
    return json;
b) In onCreate, read json, convert it to ListMap (fruitList) and display it in ListView.
String json_data = _readJsonFromAsset("fruits.json");

fruitList = new Gson().fromJson(json_data, new TypeToken<ArrayList<HashMap<String, Object>>>(){}.getType());

		binding.listview1.setAdapter(new Listview1Adapter(fruitList));

		((BaseAdapter)binding.listview1.getAdapter()).notifyDataSetChanged();
2. Add a Button btn_table. Also add an Intent component intent.
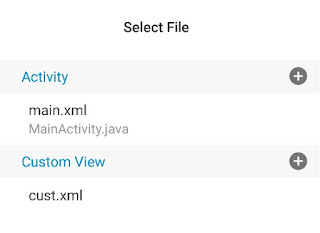
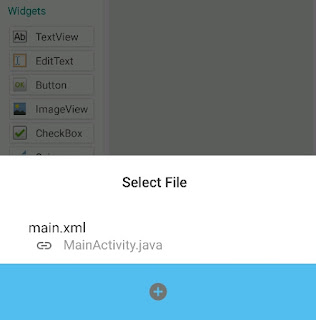
3. Add a new page table.xml, and add a WebView webview1 in it.
4. In btn_table onClick, use intent to move to TableActivity. Set the json data and title as extra keys.
String json_data = _readJsonFromAsset("fruits.json");

Intent intent = new Intent();
intent.setClass(getApplicationContext(), TableActivity.class);
intent.putExtra("json", json_data);
intent.putExtra("title", "FRUIT LIST");
startActivity(intent);
Or Using blocks as in one of the images shown below.


5. In asset manager, create a file index.html and put following codes.
<!DOCTYPE html>
<html lang="en">
<head>
  <meta charset="UTF-8" />
  <meta name="viewport" content="width=device-width, initial-scale=1.0" />
  <title>JSON Table Viewer</title>
  <link rel="stylesheet" href="style.css" />
</head>
<body>
  <div class="container">
    <div class="controls">
      <button onclick="printLandscape()">Print Table</button>
    </div>

    <h2 id="titleDisplay">My JSON Table</h2>
    <table id="dataTable"></table>
  </div>

  <script src="script.js"></script>
</body>
</html>
6. Create another file style.css in assets folder and put following codes in it.
body {
  font-family: Arial, sans-serif;
  background: #f2f2f2;
  margin: 0;
  padding: 0;
}

.container {
  max-width: 90%;
  margin: 40px auto;
  background: #fff;
  padding: 10px 20px;
  border-radius: 12px;
  box-shadow: 0 0 8px rgba(0, 0, 0, 0.1);
  overflow-x: auto; /* ✅ Horizontal scroll for wide tables */
}

table {
  width: 100%;
  border-collapse: collapse;
  table-layout: auto;
  word-wrap: break-word;
}

th, td {
  border: 1px solid #ccc;
  padding: 10px;
  text-align: left;
  white-space: nowrap;
}

@media (max-width: 768px) {
  th, td {
    white-space: normal;
  }
}

.controls {
  display: flex;
  align-items: center;
  justify-content: center; /* ✅ center the button horizontally */
  gap: 10px;
  margin: 10px auto 20px;
  padding: 0 16px;
  width: 90%;
  box-sizing: border-box;
}

button {
  padding: 8px 14px;
  border: none;
  background-color: #007bff;
  color: white;
  border-radius: 8px;
  cursor: pointer;
  font-size: 15px;
}

button:hover {
  background-color: #0056b3;
}

#titleDisplay {
  text-align: center;
  margin-bottom: 20px;
  font-weight: bold;
  font-size: 20px;
}

/* Landscape print style */
@media print {
  @page {
    size: landscape;
    margin: 20mm;
  }

  body {
    background: white;
  }

  .controls {
    display: none;
  }

  #titleDisplay {
    font-size: 18px;
    font-weight: bold;
    text-align: center;
    margin-bottom: 15px;
  }
}
7. Create script.js file in assets folder and put following codes in it.
// Get query parameter
function getQueryParam(param) {
  const urlParams = new URLSearchParams(window.location.search);
  return urlParams.get(param);
}

// Load JSON data into table
function loadTable(jsonData) {
  const table = document.getElementById("dataTable");
  table.innerHTML = "";

  if (!jsonData || jsonData.length === 0) return;

  const headers = Object.keys(jsonData[0]);
  const headerRow = table.insertRow();

  headers.forEach(header => {
    if (header.toLowerCase() === "id" || header.toLowerCase() === "uid") return;

    const th = document.createElement("th");
    const cleanHeader = header.replaceAll("_", " ");
    const formattedHeader = cleanHeader.charAt(0).toUpperCase() + cleanHeader.slice(1);
    th.textContent = formattedHeader;
    headerRow.appendChild(th);
  });

  jsonData.forEach(item => {
    const row = table.insertRow();
    headers.forEach(header => {
      if (header.toLowerCase() === "id" || header.toLowerCase() === "uid") return;
      const cell = row.insertCell();
      cell.textContent = item[header];
    });
  });
}

// Print table in landscape with title
function printLandscape() {
  const title = document.getElementById("titleDisplay").textContent;
  const printWindow = window.open("", "_blank");
  const tableHTML = `
    <html>
      <head>
        <title>${title}</title>
        <style>
          @page { size: landscape; margin: 20mm; }
          body { font-family: Arial, sans-serif; background: white; }
          h2 { text-align: center; font-weight: bold; margin-bottom: 15px; }
          table { width: 100%; border-collapse: collapse; }
          th, td { border: 1px solid #ccc; padding: 10px; text-align: left; }
          th { background-color: #007bff; color: white; }
        </style>
      </head>
      <body>
        <h2>${title}</h2>
        ${document.getElementById("dataTable").outerHTML}
      </body>
    </html>
  `;
  printWindow.document.write(tableHTML);
  printWindow.document.close();
  printWindow.focus();
  printWindow.print();
}

// Load data when page starts
window.onload = async function () {
  const dataParam = getQueryParam("data");
  const dataUrl = getQueryParam("dataUrl");
  const dataTitle = getQueryParam("title");
  const titleDisplay = document.getElementById("titleDisplay");

  if (dataTitle) titleDisplay.textContent = dataTitle;

  try {
    if (dataParam) {
      const decoded = decodeURIComponent(dataParam);
      const jsonData = JSON.parse(decoded);
      loadTable(jsonData);
    } else if (dataUrl) {
      const response = await fetch(dataUrl);
      const jsonData = await response.json();
      loadTable(jsonData);
    } else {
      const sampleData = [
        { Name: "John Doe", Age: 30, City: "New York" },
        { Name: "Jane Smith", Age: 25, City: "London" },
        { Name: "Michael Lee", Age: 35, City: "Sydney" },
        { Name: "Sita Patel", Age: 28, City: "Mumbai" }
      ];
      loadTable(sampleData);
    }
  } catch (err) {
    console.error("Error loading JSON:", err);
    document.getElementById("dataTable").innerHTML = "<tr><td>Error loading JSON</td></tr>";
  }
};
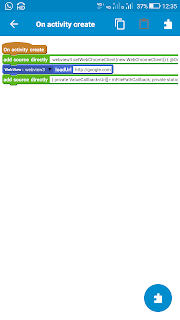
8. In TableActivity onCreate event, load the json in WebView.

The codes used in add source directly block:
binding.webview1.getSettings().setJavaScriptEnabled(true);

binding.webview1.loadUrl("file:///android_asset/index.html?data=" + json + "&title=" + title);


Noce
ReplyDelete