Posts

Showing posts from October, 2017

Custom dialog box in Sketchware using CustomView

Image
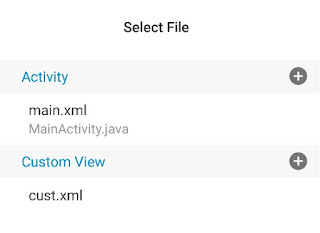
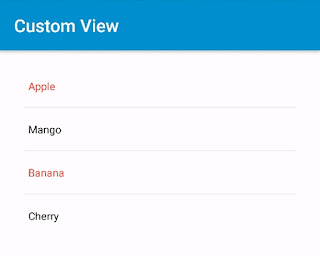
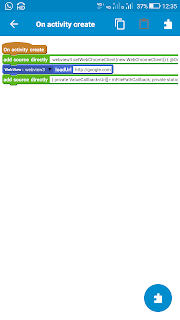
The CustomView can be used to create a custom dialog box in Sketchware, by using simple codes. Follow the steps below to create a custom dialog pop-up. 1. In VIEW area of your project add a new CustomView . In the image above I have added a new CustomView 'cust.xml'. 2. Design the CustomView the way you want your custom dialog box to look like. In the image above, I have added an ImageView, two TextViews, and two Buttons (namely 'button1' and 'button2'). 3. Choose the event on which you want to show the dialog. It can be onBackPressed or onButtonClick, etc. 4. On the event when dialog is to be shown, use add source directly block to create and show the dialog box. In the image above I have added the code to onBackPressed event. The code used is explained below. a) First use the code to create a dialog. final AlertDialog dialog2 = new AlertDialog.Builder( MainActivity .this).create(); Note that here 'MainActivity' is the nam

How to create a custom ListView in Sketchware?

Image
The recently added Custom View in Sketchware can be used to create custom ListView. The steps you need to follow in order to create a custom ListView are given below. 1. In VIEW area of your sketchware project, add a ListView . 2. Add a new CustomView. 3. Now in properties of ListView , select the new view you added as customView . 4. Now in the VIEW area of CustomView, add a Linear (H) and a TextView . 5. In LOGIC area of your app, add a new list Map . 6. In onCreate event in your project, add items to the Map list using a single key. After adding items to list, setListCustomViewData of ListView to List Map (See image below). 7. In LOGIC area of your app add a new event​ ListView: onBindCustomView . 8. In event ListView: onBindCustomView , set the text of TextView in CustomView to the data from list Map. 9. If you want to implement some action on clicking any particular item in CustomView​, use the When view... clicked block av

How to change color of Seekbar, Checkbox, and Switch in Sketchware?

Image
The color of various widgets can be changed programmatically with simple codes. Provided below are a few codes which can be used in Sketchware to change the color of Seekbar, Checkbox and Switch. Codes for Seekbar To change color of Seekbar progress and Seekbar thumb use the codes provided below in add source directly block in onCreate event. seekbar1.getProgressDrawable().setColorFilter(Color.parseColor("#FF00FF"), PorterDuff.Mode.SRC_IN); seekbar1.getThumb().setColorFilter(Color.parseColor("#FF00FF"), PorterDuff.Mode.SRC_IN); Note that in the code above seekbar1 is the name or id of the Seekbar inserted in VIEW area. The Seekbar thumb can be made invisible by using 00 for AA in code #AARRGGBB in color code. So code for no thumb may look like: seekbar1.getThumb().setColorFilter(Color.parseColor("#00FF00FF"), PorterDuff.Mode.SRC_IN); We can also use an image as Seekbar progress and Seekbar thumb, by using following code: seekbar1.

Code for implementing Notifications in Sketchware

Image
This tutorial shows a Sketchware android project example in which a Notification is displayed when a Button is clicked and when the Notification is clicked, it opens a new Activity. 1. Create a new project in Sketchware. In VIEW area add an EditText  edittext1 , and a Button button1 . 2. Using Image Manager add an images  mail_white . This will be used as the Notification icon. 3. In Library manager switch on  AppCompat and Design . 4. Create a new VIEW two.xml / TwoActivity.java . 5. Add a More Block:   createChannel . 6. In More Block  createChannel , use add source directly block and put following code: if (Build.VERSION.SDK_INT >= Build.VERSION_CODES.O) { CharSequence name = "Channel name 1"; String description = "Notification channel"; int importance = NotificationManager.IMPORTANCE_DEFAULT; NotificationChannel channel = new NotificationChannel("id 1", name, importance); channel.setDescription(description); Notifi

Code for moving or dragging an image in sketchware android project

Image
Now with the introduction of add source directly block in Sketchware, several such actions are possible which were not possible earlier. One such action is dragging an image by touching it. It is very simple to move an image with movement of finger. First insert an ImageView in VIEW area, inside any Layout. Name it as img . Upload image using image manager and set the image in ImageView. After that in LOGIC area in onCreate event, use operator block add source directly , and add the following code: img.setOnTouchListener(new OnTouchListener() { PointF DownPT = new PointF(); PointF StartPT = new PointF(); @Override public boolean onTouch(View v, MotionEvent event) { int eid = event.getAction(); switch (eid) { case MotionEvent.ACTION_MOVE : PointF mv = new PointF( event.getX() - DownPT.x, event.getY() - DownPT.y); img.setX((int)(StartPT.x+mv.x)); img.setY((int)(StartPT.y+mv.y)); StartPT = new PointF( img.getX(), img.getY() ); break ; case MotionEvent.ACTION_DOWN : DownP

Few codes to modify scrollbar in Sketchware

In Sketchware very limited modifications can be made to the scrollbar. Provided below are a few codes which work in Sketchware. 1. Make the scrollbar invisible The scrollbar of Scrollview, ListView​, or Spinner can be made invisible by using following code in onCreate event by using add source directly block. For vertical ScrollView: vscroll1.setVerticalScrollBarEnabled(false); For horizontal ScrollView: hscroll1.setHorizontalScrollBarEnabled(false); For ListView: listview1.setVerticalScrollBarEnabled(false); For Spinner: spinner1.setVerticalScrollBarEnabled(false); For WebView: webview1.setVerticalScrollBarEnabled(false); webview1.setHorizontalScrollBarEnabled(false); Note that in this code vscroll1, hscroll1, listview1, webview1 and spinner1 are id of the Layout or widget inserted in VIEW area. This has to be changed according to the id of the Layout or widget whose scrollbar is to be removed. 2. Change position of scrollbar The scrollbar can be positioned

How to change status bar color in Sketchware?

Image
Earlier code injection method was required for changing status bar color in sketchware. But now in newer versions of sketchware it can easily be done using add source directly block. To change the status bar color in sketchware project, insert add source directly block in onCreate event in LOGIC of the project, and then write the following code. Window w = this.getWindow(); w.clearFlags(WindowManager.LayoutParams.FLAG_TRANSLUCENT_STATUS); w.addFlags(WindowManager.LayoutParams.FLAG_DRAWS_SYSTEM_BAR_BACKGROUNDS); w.setStatusBarColor(Color.parseColor("#000000")); Change the hex color code in last line of the code as per the requirement. It will change color of status bar to the color code provided in the code above. This code has to be used on each screen of the app. Note that this code works in Android versions 5 and above. When the app is used in lower versions, it may crash the app. Therefore, we should use if..else.. to apply this code in compatible ver

How to enable upload from webview in Sketchware?

Image
Now that Sketchware has a block to add java code directly in the project, it is possible to enable file upload in webview. To enable file upload in webview in sketchware app, follow the steps given below. 1. Insert a webview in VIEW area in the sketchware project. Note the ID of webview, usually it is webview1 . 2. In LOGIC area of project, in onCreate event, add the block add source directly and copy the following code in it: webview1.setWebChromeClient(new WebChromeClient() { // For 3.0+ Devices protected void openFileChooser(ValueCallback uploadMsg, String acceptType) { mUploadMessage = uploadMsg; Intent i = new Intent(Intent.ACTION_GET_CONTENT); i.addCategory(Intent.CATEGORY_OPENABLE); i.setType("image/*"); startActivityForResult(Intent.createChooser(i, "File Browser"), FILECHOOSER_RESULTCODE); } // For Lollipop 5.0+ Devices public boolean onShowFileChooser(WebView mWebView, ValueCallback<Uri[]> filePathCallback, WebChromeClient.FileChoose