Posts

Showing posts from March, 2018

OptionsMenu in Sketchware

Image
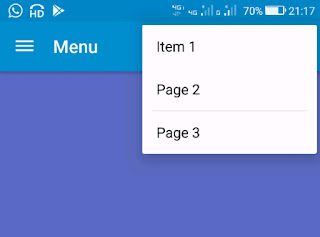
In order to create OptionsMenu in Sketchware, follow the steps given below. 1. Create a more Block extra in your project. 2. To define this more block extra  use an add source directly block and put following code in it. } @Override public boolean onCreateOptionsMenu (Menu menu){ menu.add(0, 0, 0, "Item 1"); menu.add(0, 1, 1, "Item 2"); menu.add(0, 2, 2, "Item 3"); return true; } Note that here the first } closes more block. Rest of the code is outside the more block extra . This is to code for onCreateOptionsMenu where three items are added to the menu. Also note that 0, 1, and 2 are Id of the items added to the menu, and Item 1, Item 2, Item 3 are the title of the items added. Change the titles to whatever you want. To display the OptionsMenu items as icons on the ActionBar, add the id of the images to the menu items. Suppose ic_settings_white is the icon for item 1. Then the code above will change as below. } @Override pub

Check for latest app version using Firebase in Sketchware

Image
You can store the latest version of your app in Firebase realtime database, and then check and compare it with the actual version of installed app. Follow the instructions below to know how to do this. 1. In your Firebase app in sketchware, in library manager, make sure you have entered correct App ID and project ID, and that Firebase switch is on. 2. Make sure the rules in your Firebase database are read and write true. 3. On the MainActivity or the Activity in which you want to check for the latest app version, add a new FirebaseDB component called Ver:version . 4. Create three new String variables, package_name ,  your_version and latest_version , and a new Map variable map . 5. In  onCreate  event, set the string  package_name  to package name of your app. 6. Next in onCreate, use an add source directly block and put codes for getting the version of presently installed app. try { android.content.pm.PackageInfo pinfo = getPackageManager().getPackageInfo( pack

DatePickerDialog in Sketchware

Image
To create a DatePickerDialog in Sketchware android project follow the steps given below. 1. In VIEW area of your sketchware android project, insert a LinearH and inside it insert a TextView textview1 , an EditText edittext1 and an ImageView imageview1 . For textview1 write text as ' Date: '. For edittext1 write hint as dd/mm/yyyy  and deselect 'enabled' in it's properties. 2. Choose image of a Calendar using image manager and set it as image of imageview1 . 3. Switch On AppCompat and Design. 4. Create a More Block showDatePicker . In this block, use an add source directly block and put following code. androidx.appcompat.app.AppCompatDialogFragment newFragment = new DatePickerFragment(); newFragment.show(getSupportFragmentManager(), "Date Picker"); 5. Create another More Block  extra.  In this put codes to define a DialogFragment. } public static class DatePickerFragment extends androidx.appcompat.app.AppCompatDialogFragment impl

Changing text size and color of spinner in Sketchware

Image
To change the text size and color of spinner dropdown list, follow the instructions given below. 1. In VIEW area of your Sketchware Android project, insert a Spinner spinner1 . 2. In LOGIC area, add a new String list list1 . 3. In onCreate event add items to the list. 4. After adding items to the String list, insert an add source directly block and put following code in it: spinner1.setAdapter(new ArrayAdapter (this, android.R.layout.simple_list_item_1, android.R.id.text1, list1) { @Override public View getView(int position, View convertView, ViewGroup parent) { TextView textView1 = (TextView) super.getView(position, convertView, parent); textView1.setTextColor(Color.RED); textView1.setTextSize(24); return textView1; } @Override public View getDropDownView(int position, View convertView, ViewGroup parent) { TextView textView1 = (TextView) super.getDropDownView(position, convertView, parent); textView1.setTextColor(Color.RED); textView1.setTextSize(24); retu