Flash light app in Sketchware pro
Follow the steps given below to create a Flash light android app in Sketchware pro.
1. Create a new app in Sketchware pro.
2. Switch on AppCompat and Design.
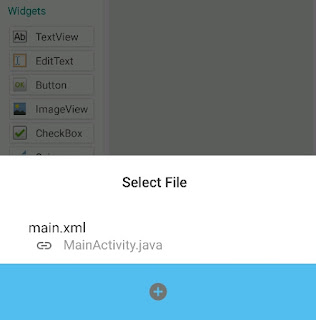
3. In View area (main.xml), add a Linear Vertical with gravity set to center_horizontal and center_vertical. Inside this add an ImageView imageview1.
4. In image manager, add two images ic_flash_on_black and ic_flash_off_black.
5. For imageview1, select ic_flash_off_black as image.

6. In MainActivity, add import event and add following imports in it.
import android.hardware.camera2.CameraManager;
import android.hardware.camera2.CameraAccessException;
7. Add Camera Component cam.
8. Create two boolean variables hasCameraFlash and flashLightStatus and add a String variable cameraId.
9. Add a custom variable cameraManager of type CameraManager.

10. In onCreate, define hasCameraFlash, cameraManager, and cameraId. Register a callback for cameraManager CameraManager.TorchCallback to listen for changes in the flashlight state.
// Check if the device has a camera flash feature
hasCameraFlash = getPackageManager().hasSystemFeature(PackageManager.FEATURE_CAMERA_FLASH);

// Get the CameraManager system service, used to access camera devices and control torch mode
cameraManager = (CameraManager) getSystemService(Context.CAMERA_SERVICE);

try {
    // Get the ID of the first available camera (usually the rear-facing one)
    cameraId = cameraManager.getCameraIdList()[0];
} catch (CameraAccessException e) {
    // Handle exception if the camera cannot be accessed
    e.printStackTrace();
}

// Create a TorchCallback to listen for changes in the torch (flashlight) mode
CameraManager.TorchCallback torchCallback = new CameraManager.TorchCallback() {

    @Override
    public void onTorchModeChanged(String cameraId, boolean enabled) {
        super.onTorchModeChanged(cameraId, enabled);

        // Update your flashlight status variable based on the system callback
        flashLightStatus = enabled;

        // Change the icon in the UI based on the flashlight state
        if (enabled) {
            imageview1.setImageResource(R.drawable.ic_flash_on_black);  // Flash ON icon
        } else {
            imageview1.setImageResource(R.drawable.ic_flash_off_black); // Flash OFF icon
        }
    }

    @Override
    public void onTorchModeUnavailable(String cameraId) {
        super.onTorchModeUnavailable(cameraId);

        // Optional: handle the case where the torch becomes unavailable (e.g., in use by another app)
        // You can show a toast or disable the flash toggle button here
    }
};

// Register the TorchCallback with the CameraManager
// The second parameter (null) means the callback will be run on the main thread
cameraManager.registerTorchCallback(torchCallback, null);
11. Create a more block flashLightOn and put following code in it.
try {
cameraManager.setTorchMode(cameraId, true);
} catch (CameraAccessException e) { e.printStackTrace();
}
12. Create a more block flashLightOff and put following code in it.
try {
cameraManager.setTorchMode(cameraId, false);
} catch (CameraAccessException e) { e.printStackTrace();
}
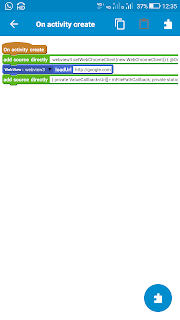
13. In imageview1 onClick event use blocks as shown in image below to toggle flash light on and off.


Comments
Post a Comment