Posts

Showing posts from February, 2020

Androidx ViewPager in Sketchware

Image
The example provided below shows how to create a simple ViewPager with four pages in Sketchware. 1. In VIEW area of main.xml add a LinearV  linear1  with width and height as match_parent. Set it's padding to 0. ViewPager will be created programmatically and added to  linear1 . 2. Switch On AppCompat and design. 3. Add four CustomViews page0.xml ,  page1.xml ,  page2.xml , and  page3.xml . These will act as the pages of the ViewPager. In page0.xml add a TextView textview1. In page1.xml add a TextView textview1. In page2.xml add a Button button1. In page3.xml add a TextView textview1. 4. Create a more block  extra  and define the block using an add source directly block. Put following code in the add source directly block. } // Create a list of pages int[] pageId = { R.layout.page0, R.layout.page1, R.layout.page2, R.layout.page3 }; // Define PagerAdapter for ViewPager private class MyPagerAdapter extends androidx.viewpager.widget.Pa

Androidx CardView in Sketchware

Image
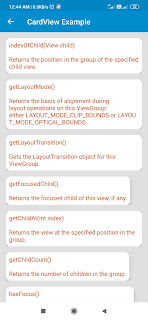
To add multiple CardViews with text contents on a page, as shown in image below, follow the steps given below. 1. In VIEW area of  main.xml  add a ScrollView with padding 0. Inside ScrollView add a LinearV linear1 . Inside linear1 add 9 LinearH. 2. Switch On AppCompat and design. 3. Create a Custom View text.xml. In text.xml add a TextView textview1 . 4. Add a String List mylist . 5. In  onCreate  event: a. Add 9 items to the String List. b. Then add following codes in add source directly block // Create a loop from 0 to to child count of linear1 for (int i = 0; i < linear1.getChildCount(); i++){ // For each i in loop create a CardView, set it's radius and elevation, and add it to the child at 1 of linear1. androidx.cardview.widget.CardView card = new androidx.cardview.widget.CardView(this); card.setRadius(30); card.setCardElevation(20); ((ViewGroup)linear1.getChildAt(i)).addView(card); // Get Custom View and the TextView in Custom View. Set tex

Androidx TabLayout in Sketchware

Image
This example provided below shows how to create a simple scrollable TabLayout and add a TabLayout.OnTabSelectedListener to it in Sketchware. 1. In VIEW area of main.xml add a TextView textview1. 2. Switch On AppCompat and design. 3. In  onCreate  event, use an add source directly block and put following codes. // Create a TabLayout (tabLayout) com.google.android.material.tabs.TabLayout tabLayout = new com.google.android.material.tabs.TabLayout(this); // Make TabLayout scrollable tabLayout.setTabMode(com.google.android.material.tabs.TabLayout.MODE_SCROLLABLE); // Add Tabs to the TabLayout tabLayout.addTab(tabLayout.newTab().setText("Sunday")); tabLayout.addTab(tabLayout.newTab().setText("Monday")); tabLayout.addTab(tabLayout.newTab().setText("Tuesday")); tabLayout.addTab(tabLayout.newTab().setText("Wednesday")); tabLayout.addTab(tabLayout.newTab().setText("Thursday")); tabLayout.addTab(tabLayout.newTab().setText("F

SlidingPaneLayout in Sketchware

Image
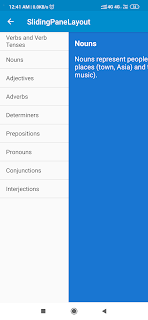
Here is a simple example of SlidingPaneLayout in Sketchware. Follow the steps below. 1. Create a new project. Switch on AppCompat and Design. 2. In main.xml add a LinearV linear1 , and set padding to 0. 3. Create a Custom View right_pane.xml . Here add two TextViews textview1 and textview2 . 4. Add a ListMap maplist , a Map map , and four More Blocks extra , createList , fragmentOne , fragmentTwo . 5. In More Block extra , declare static variables pane, one, two, title_list, and description_list. Also define a static void method setTexts(String, String). } public static androidx.slidingpanelayout.widget.SlidingPaneLayout pane; public static FragmentOne one; public static FragmentTwo two; public static ArrayList<String> title_list = new ArrayList<>(); public static ArrayList<String> description_list = new ArrayList<>(); public static void setTexts(String a, String b){ two.updateTexts(a, b); } { The method updateTexts(Str